Mango Phirni

Some of the oldest and fondest memories of my hometown are of family get-togethers and mango orchards. Mango is everyone’s favourite fruit in my family. And if you have grown up in a traditional Muslim household like me, you know that no family get-together meal is complete without Phirni.
I have always received flak from my family for not being a mango connoisseur despite growing up so close to mango orchards. 😛 Call it an emancipation of that but here is my ode to those childhood memories.

Time Required: 2-3 hours preparation, 15 mins cooking time, 5-6 hours for setting

Ingredients

Full Cream Milk: 1 litre
Rice/Rice powder: 2 tablespoon
Sugar: 1/2 cup
Cashew paste: 1 teaspoon
Cardamom: 4-5, crushed coarsely
Finely grated coconut: 1/2 cup, some more for garnishing
Mangoes : 2 peeled, cubed for puree and 2 peeled for garnishing. Make sure the mangoes are ripe and not tangy

Recipe

  1. Soak the rice for 2-3 hours. Once soaked, spread it over a kitchen towel and let it air-dry for atleast an hour. Then grind this in a mixer with some water/milk. If you have rice powder, you can mix it with a some water or milk to make a some slurry.
  2. Put the milk to boil.
  3. While the milk boils, make the cashew paste and crush the cardamoms coarsely using a mortar-pestle.
  4. Make a puree of the cubed mangoes and set it aside.
  5. Once the milk reaches its first boil, add the rice slurry. Now reduce the heat to medium-high and keep stirring every couple of minutes.
  6. Once you see that the rice has mixed evenly with the milk and you do not feel any coarse rice particles when you rub it between your fingers, add the mango puree, grated coconut & cardamom powder. Keep stirring.
  7. Once the phirni reaches another boil, add in the cashew paste, give everything a quick mix and switch off the flame.
  8. Pour the hot phirni into earthen bowls and allow it to set in the refrigerator for 5-6 hours. Once set, add mangoes/coconut on top to garnish.

Happy cooking!

MK

No bake dessert- Bounty balls

Bounty balls are mini sweetlings for everyone. Nobody can resist these mini temptations. And the best part? You can have them even if you are gluten or lactose intolerant! Also, these aren’t high on calories making them a really healthy choice for dessert. You can even make them with nuts to pack some extra energy!

This slideshow requires JavaScript.

Difficulty level: Easy

Ingredients:

  • Desiccated coconut/freshly grated coconut: 1 cup
  • Edible coconut oil: 2 tbsp (You can also use ghee if you aren’t lactose intolerant)
  • Honey: 1 tbsp (You can also use sugar if you aren’t worried about the calories)
  • Chocolate chips: 2/3 cup

Method:

  • Mix together the coconut, honey and oil. Mix them well and make small round balls with them. If the balls break, add some more coconut oil to the mixture.
  • Place the coconut balls in the freezer for around 15 mins so that the oil/ghee can bind everything together in the low temperature.
  • Meanwhile, microwave the chocolate chips so that they melt and let them cool down a bit.
  • Now take a fork, place the coconut ball over it, dip it in the chocolate and roll it over so that it gets completely covered with chocolate. Do this with each of the coconut balls until all of them are completely covered in chocolate.
  • Pop the chocolate balls back in the freezer for 20 mins.

Your bounty balls are ready to be eaten. You can either consume them the same day or keep them refrigerated for upto 2 weeks for consumption.

Have fun cooking!

Love,
MK

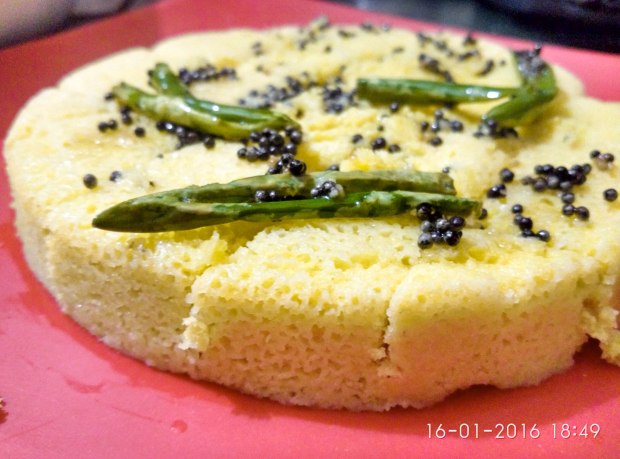
Spongy Dhokla Recipe

I have recently got a hang of making dhoklas for breakfast. They are pretty easy to make, light on the stomach and realllly yummy. I love the how the two flavours of sweet and sour mix up so well with the light and fluffy texture of the dhokla. I have two recipes for Dhokla. One is the microwave version and the other is the cooktop version. I am going to share both of them here:

Difficulty level: Easy

Ingredients:

For the sponge:

  • Gram Flour(Besan): 1 cup
  • Turmeric powder (Haldi): Just a pinch to add a vibrant yellow color to your dhokla (Optional)
  • Ginger paste: 1/2 tsp
  • Salt (to taste): I used 1/2 tsp
  • Eno fruit salt (Lemon flavour)- 1/2 tsp

For tempering:

  • Oil: 1 tbsp
  • Mustard seeds: 1tsp
  • Green chilies(slit lengthwise): 2
  • Sugar: 1 tsp
  • Lemon juice: 1 tsp

Cooktop Method

  • Sieve the gram flour and add some water to it. Whip the mixture together. Keep adding the water in small quantities and continue to whip the mixture as you do so.
  • Add the turmeric,  ginger paste and salt to the mixture, mix everything once and cover and set aside for 15 mins.
  • Till our sponge mixture gets ready, let’s set up our double boiler. If you have a steamer, you can skip this step. Take a large saucepan that can fit in the pan in which you will cook your dhokla. Take 2 cups of water in the bigger pan and set up a stand in it(you can use an inverted bowl if you don’t have a stand).
  • Now take the sponge mixture, add Eno salt to it. As soon as you add Eno, the mixture will bubble up. Transfer this to a greased pan/thali.
  • Place the pan with the mixture over the stand/inverted bowl, cover up with a lid and set it to boil for 12-15 mins. If you have a steamer, place the pan/thali in the steamer and let it steam for 12-15 mins.
  • Check for doneness by inserting a toothpick. If it comes out clean, your sponge is ready.

Microwave Method

  • Sieve the gram flour and add some water to it. Whip the mixture together. Keep adding the water in small quantities and continue to whip the mixture as you do so.
  • Add the turmeric,  ginger paste and salt to the mixture, mix everything once and cover and set aside for 15 mins.
  • Now take the sponge mixture, add Eno salt to it. As soon as you add Eno, the mixture will bubble up. Transfer this to a greased pan/thali.
  • Pop your mixture into a microwave set to high for 5 mins.
  • Check for doneness by inserting a toothpick. If it comes out clean, your sponge is ready.

Tempering

After you’ve cooked the sponge(using either methods), you need to add the tempering. While the sponge provides the texture, the tempering is what’s really packed with flavors.

  • In a tempering pan, add the oil and let it heat.
  • Add the mustard seeds and when they start to crackle, add the slit green chilies.
  • Add 2-3 tbsp of water. Add the sugar and take the tempering off the heat.
  • Add the lemon juice to the tempering.

When ready to serve, cut the sponge into square pieces, pour the tempering over the squares and garnish with chopped coriander and grated coconut.

IMG_20160116_184918_HDR

Have fun cooking!

Love,
MK

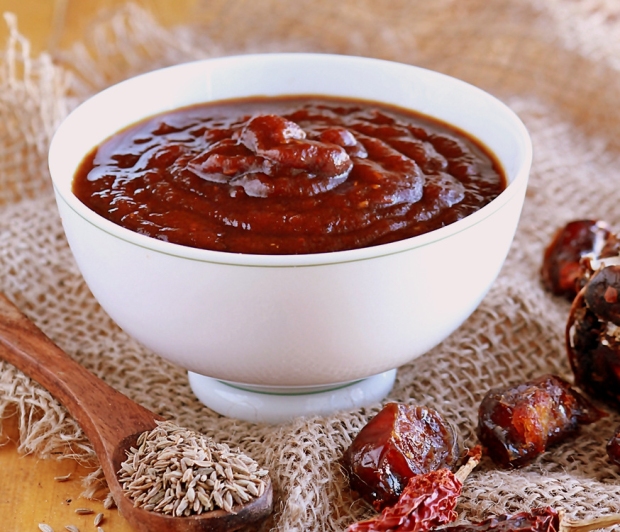
Tamarind chutney (Mom’s version)

An easy to make Tamarind chutney- it’s just the right balance of sweet and tangy and spicy. I love this chutney for its versatile nature. You can add this to any chaat(see my Bhelpuri recipe here) or drizzle it over dahi bhallas. And if you are a lazy ass picky eater just like me, who hates the dalia/khichdi/veggies, you could add this to any of these tasteless dishes and make them worth eating.

Datetamarind-chutney5

I dare not sway from the measurements and ingredients that my mother uses. So here’s the step by step, right to the measurement recipe for the same.

Ingredients:

  • Tamarind/Imli (soaked in water for at least 4 hours or  for 2 hours in hot water if making in a jiffy)- 100 gm
  • Sugar – 125 gm
  • Salt, Black pepper, red chilli powder –  My mother uses 1/2 tsp each but you can tune it to your taste
  • Dry ginger powder – 1/2 tsp
  • Cumin (roasted) – 1/2 tsp
  • Dried Dates and Dry fruits of your choice (Optional)

Method:

This could get a little messy. So make sure you are wearing an apron over your dress.

  • Mash the tamarinds in water using your bare hands so that you can reap all the pulp out. Strain the mixture into a heavy bottomed saucepan.
  • Add sugar and let it cook until the sugar mixes completely.
  • Add the salt, pepper, chilli powder, dry ginger powder and keep stirring until the mixture thickens. It should be of the same consistency as your tomato ketchup. If you like it more watery, adjust the consistency with some water.
  • Sprinkle the roasted cumin over the the mixture and let it rest until it cools.
  • You can also add any dry fruits of your choice after dry roasting them.
  • You can now transfer this to an airtight container and store it for 2-3 months in the refrigerator.

Love,
MK

Crunchy, Tangy Bhel puri

A really simple and quick recipe with a burst of different flavors and textures.

2701375824_1391f20ef1_b

Time required: 20 mins (including all the chopping and cooking)

Ingredients:

  • Puffed rice – 3 cups
  • Onion (finely chopped)- 1 large
  • Tomatoes (finely diced) – 1 large
  • Black grams/Chickpea (boiled) OR peanuts(roasted)- Half cup (optional)
  • Sev/Namkeen(any variety but I prefer the one that’s just salted) – Half cup
  • Squeezed lemon juice- 1 tbsp
  • Tamarind chutney(Mom’s version) – 2 tbsp
  • Green Chilli sauce – 1 tsp
  • Chaat Masala – 2 tsp
  • Salt, Red chilli powder – whatever amount your taste buds like
  • A teaspoon of powdered sugar
  • You can also add chopped green chillis if you like it spicy

Method:

  1. Dry roast the puffed rice. For dummies- just toss all your puffed rice into a frying pan, do not add any oil, turn the cooktop on, and stir occasionally to not let the rice burn. This makes the puffed rice really crispy.
  2. Mix the black grams/chickpea/peanuts and sev/namkeen with the puffed rice.
  3. Mix together the chopped onions, diced tomatoes, chopped green chillis. Add the chutney, green chilli sauce, chaat masala, salt, red chilli powder to this mixture. Adding some powdered sugar takes up the flavour one notch.
  4. When ready to serve, put together the puffed rice mixture with vegetables mixture in a deep bowl, cover with a plate and do some swift biceps curls to mix everything up properly. 😛
  5. Finally squeeze some lemon juice on the top and serve or eat up!

P.S. Make sure that you do the last two steps just before consumption otherwise the bhel-puri will turn soggy.

Love,
MK